
This guide explains how to configure and manage the integration between Ordway Labs and NetSuite.
Contents
Introduction
Ordway’s NetSuite integration enables you to:
- Map Customers
- Map Chart of Accounts (COA)
- Map Products
- Sync Transactions
- Send Journal Entries to NetSuite
This integration ensures financial data generated in Ordway is accurately reflected in the NetSuite General Ledger (GL).
Best Practices
You must choose one of the following:
- Send transactions to NetSuite or,
- Send Journal Entries to NetSuite
Sending both is not supported and will create duplicate GL entries.
Preconditions
Before configuring the integration:
- You must have an active NetSuite account.
- You must have administrator permissions in NetSuite.
- You must have appropriate permissions in Ordway to configure integrations and mappings.
- NetSuite authentication credentials (Account ID, Client ID, Token ID, etc.) must already be created.
Connect NetSuite to Ordway
Steps
- In the left navigation menu of Ordway, click Setup > Integrations > Integration Settings. The Integration Settings page is displayed.
- Locate NetSuite and click Connect. The Connect to NetSuite dialog box is displayed.
- Connection Fields: Enter the following values to complete the NetSuite connection: These values must be generated in NetSuite before initiating the connection in Ordway.
| Field | Description | Where to Find in NetSuite |
| Account ID | NetSuite account identifier | Setup > Integration > SOAP Web Services Preferences |
| Client ID | Client identifier | Setup > Integration > Manage Integrations > New. The value for Client ID is displayed on the initial setup page while creation - visible only once |
| Client Secret | Client secret key | Setup > Integration > Manage Integrations > New. The value for Client Secret is displayed on the initial setup page while creation - visible only once |
| Token ID | Access token ID | Setup > Users/Roles > Access Tokens > New. The value for Token ID is displayed on the initial setup page while creation - visible only once |
| Token Secret | Access token secret | Setup > Users/Roles > Access Tokens > New. The value for Token Secret is displayed on the initial setup page while creation - visible only once |
| WSDL Domain | SOAP endpoint domain | Setup > Company > Company Information > Company URLs (SuiteTalk section) |
Please refer to NetSuite Authentication and Configuration for full details on generating and locating these values.
Expected Results
The connection is successfully established.
The CONNECT button changes to SETTINGS.
The NetSuite Integration Settings page becomes available.
NetSuite Default Settings
After establishing the NetSuite connection in Ordway, configure the default integration settings. This page lets you configure basic settings for the NetSuite integration.
Navigate to Default Settings
- In the left navigation menu of Ordway, click Setup > Integrations > Integration Settings. The Integration Settings page is displayed.
- Select NetSuite.
- Click DEFAULT SETTINGS.
-
The General Settings page is displayed.
Configure General Settings
Enable Line Level Tax
Enables tax calculation and synchronization at the individual line-item level. Refer NetSuite Line-Level Tax Integration
When enabled
- Taxes are calculated and sent for each invoice line item.
- Supports scenarios where different products or services have different tax treatments.
When disabled
- Tax is handled at the document level.
NetSuite Tax Agencies
Select the NetSuite Tax Agency that should be associated with tax transactions synchronized from Ordway.
Purpose
- Maps Ordway tax transactions to the corresponding tax agency in NetSuite.
- Ensures taxes are reported against the correct tax authority.
NetSuite Tax Account
Select the NetSuite General Ledger account used to record tax liabilities.
Purpose
- Stores tax amounts collected from customers.
- Used during invoice and tax synchronization.
Example
- Sales Taxes Payable
Default Refund Method
Specifies the default refund method used when refund transactions are synchronized to NetSuite.
Purpose
- Ensures refund transactions are posted using a valid NetSuite refund method.
Additional Currencies
Use the Additional Currencies setting to specify the currencies that can be synchronized between Ordway and NetSuite in addition to the company's base currency.
Steps
- Navigate to Integrations > NetSuite > NetSuite Default Settings.
- In the General Settings section, locate Additional Currencies.
- Click the Additional Currencies field.
- Select one or more currencies from the dropdown list.
- Click Save.
Result
The selected currencies are added to the NetSuite integration configuration and are available for transaction synchronization between Ordway and NetSuite.
Field Details
| Attribute | Description |
|---|---|
| Field Name | Additional Currencies |
| Field Type | Multi-select |
| Default Value | None |
| Required | No |
Notes
- Multiple currencies can be selected.
- The list displays currencies supported by the NetSuite integration.
- Selected currencies appear as chips within the field and can be removed individually by clicking the X icon.
- Changes take effect after the NetSuite integration settings are saved.
- The Additional Currencies setting supplements the company's primary currency configuration and does not change the base currency defined in Ordway or NetSuite.
Enable Multiple Subsidiaries (Toggle)
Allows Ordway to synchronize records across multiple NetSuite subsidiaries.
When enabled
- Subsidiary-specific data can be synchronized.
- Supports organizations operating multiple legal entities within NetSuite.
When disabled
- Synchronization is limited to a single subsidiary configuration.
Create Reversal JE on JE Delete Failure (Toggle)
When enabled, Ordway automatically creates a reversing Journal Entry in NetSuite if deletion of a previously synced Journal Entry fails.
Deletion may fail if
Journal Entry deletion may fail in NetSuite for several reasons, including:
The Journal Entry has already been approved
The accounting period is closed
Role permissions do not allow deletion
Why this is important
Prevents accounting imbalance
Maintains audit consistency
Ensures GL remains aligned between Ordway and NetSuite
The reversal Journal Entry is created directly in NetSuite and mirrors the original entry with opposite debit/credit values.
Enable this option to maintain synchronization integrity and accounting compliance.
Connection Information
Displays the date when the NetSuite connection was established. This field is informational only and cannot be edited.
Example
- Connection Established: Jul 16, 2025
Disconnect
Removes the active connection between Ordway and NetSuite.
Use with caution.
Disconnecting:
- Stops future synchronization.
- Does not delete historical synchronization records.
- Requires reconnection before additional data can be synchronized.
Save Configuration
After updating any settings:
- Review the configuration.
- Click SAVE.
- Verify synchronization behavior using a test transaction before applying changes in production.
Configure Integration Objects
After establishing connection and default settings, configure each object individually.
Available objects:
Objects can be enabled independently based on your integration strategy.
Understanding Integration Controls
Each integration object (for example, Customers, Products, Invoices, Journal Entries) includes standardized controls that determine how data is mapped and synchronized between Ordway and NetSuite.
Map and Sync
The Map & Sync option opens the configuration page for a specific object.
From this page, you must:
Map records (Ordway → NetSuite)
Map fields
Enable synchronization
Mapping must be completed before enabling sync to ensure data is correctly aligned between systems.
Sync Toggle
The Sync toggle controls whether data is actively synchronized for that object.
When Enabled
Data automatically syncs between Ordway and NetSuite.
New records are pushed according to configuration.
Updates to mapped records are reflected in the connected system.
When Disabled
No new data is transferred.
Existing configurations and mappings remain saved.
Synchronization can be re-enabled at any time.
Disabling sync does not delete previously synced records.
Mapping Tabs
Each object includes mapping tabs that define how records and fields correspond between systems.
Record Mapping → Matches Ordway records to NetSuite records
Field Mapping → Maps header-level fields
Line Field Mapping → Maps line-level transaction fields (when applicable)
Mapping defines how data fields correspond between systems.
Customers
Customers sync includes three mapping areas:
To begin:
- Enable the Customer Data toggle.
- Click Map and Sync Customers.
- The Customers Data page is displayed.
- Turn on Sync Customers toggle to sync customer data automatically from Ordway to NetSuite.
-
When enabled:
- Existing customers in Ordway are synced to NetSuite.
- New customers created in Ordway are automatically pushed to NetSuite.
- Updates made to synced customers are reflected in NetSuite (based on field mapping configuration).
Import or Export Option
When mapping a large number of customers,
- Use the Import Customers and Export Customers options available under the More (⋮) menu in the top-right corner of the Customer Data page.
- Export Customers (download active customers and mappings)
- Import Customers (bulk update mappings)
Customer Record Mapping
Click the CUSTOMER RECORD MAPPING tab to map all customer records by selecting the appropriate NetSuite Customer record in the right column that corresponds with the Ordway Customer Name field on the left.
- Use the Customers FILTER option to isolate specific Ordway records.
- The Show Unmapped Only toggle filters the customer list to display only customers that are not yet mapped to a NetSuite record.
- Use the Sync Customers toggle (top-right corner) to enable or disable automatic customer synchronization.
Customer Field Mapping
Next, click the CUSTOMER FIELD MAPPING tab. Select the appropriate NetSuite Customer Fields in the right column that corresponds with the Ordway Customer Fields on the left.
Contact Field Mapping
Finally, click the CONTACT FIELD MAPPING tab. Select the appropriate NetSuite Contact Field Name in the right column that corresponds with the Ordway Contact Field Name on the left.
- After completing your configuration, click SAVE. The “NetSuite - Integration Settings successfully updated” confirmation message appears.
- Your changes are now applied and will take effect for future sync operations.
Add Custom and Contact Field Mappings
The CUSTOMER FILED MAPPING and CONTACY FILED MAPPING tabs allow you to create additional field mappings between Ordway and NetSuite account fields.
To add a new mapping:
- Click + Add.
- In the Ordway Customer Field Name dropdown, select the Ordway field you want to map.
- In the NetSuite Customer Field Name dropdown, select the corresponding NetSuite field.
- Click Save. The newly added mapping is included in future synchronization between Ordway and NetSuite.
Note: The + Add functionality is available across all field mapping sections within the NetSuite integration, including Customer Field Mapping, Contact Field Mapping, and other supported field-level mapping tabs. Use this option to create additional custom mappings between Ordway fields and the corresponding NetSuite fields to support your organization's synchronization requirements.
Chart of Accounts (COA)
Click Map and Sync Chart of Accounts to connect NetSuite Chart of Accounts in Ordway.
Be sure to map your Chart of Accounts properly before syncing Products in the next section.
The Chart of Account page is displayed with the below tabs:
The Export Chart of Accounts Mappings file provides a list of all active Chart of Accounts and existing mappings available to populate the Import Chart of Accounts Mappings import template.
Chart of Accounts Record Mapping
Click the CHART OF ACCOUNTS RECORD MAPPING tab, to map all Chart of Account Record fields by selecting the appropriate NetSuite Account Name in the right column that corresponds with the Ordway COA Code and Ordway COA Name on the left.
- Use the Chart of Accounts FILTER option to isolate specific Ordway Objects.
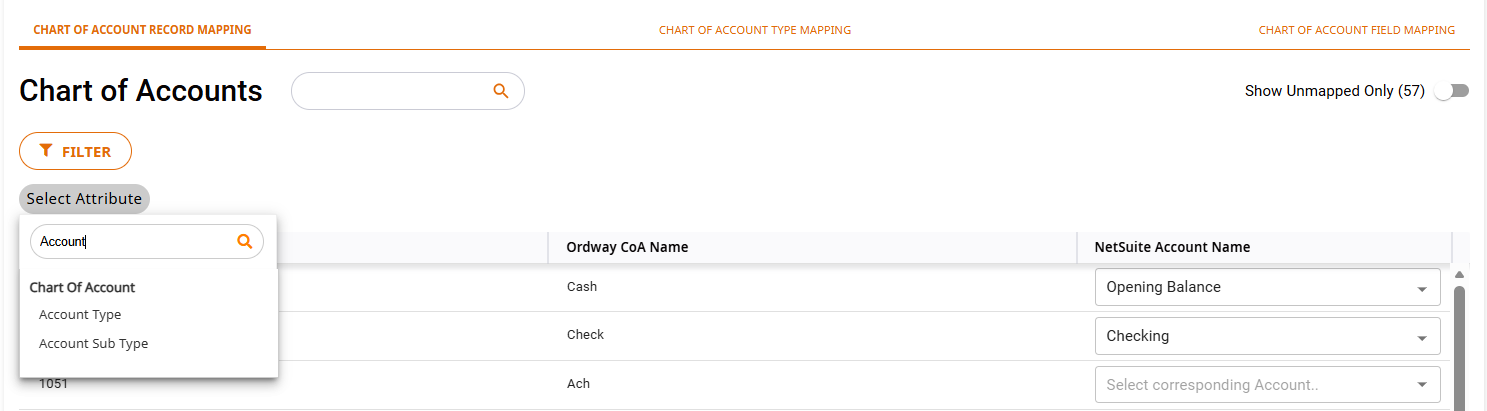
Chart of Accounts Type Mapping
Next, click the CHART OF ACCOUNT TYPE MAPPING tab. Select the appropriate NetSuite Account Type in the right column that corresponds with the Ordway Chart of Account Sub-Type on the left.
Chart of Accounts Field Mapping
Finally, click the CHART OF ACCOUNT FIELD MAPPING tab. Select the appropriate NetSuite Account Field Name in the right column that corresponds with the Ordway Chart of Account Field Name on the left.
- Fields can be removed by clicking the x next to the drop-down arrow. Select the new field to replace what was removed.
- After completing your configuration, click SAVE. The “NetSuite - Integration Settings successfully updated” confirmation message appears.
- Your changes are now applied and will take effect for future sync operations.
Products
It’s important to note that when Invoices are being synced that the GL Account selected on the Credit side of the Invoice Posting transaction will override the GL Account that has been selected as the default account in NetSuite. This is especially important when considering Deferred Revenue transactions.
- Click Map and Sync Products to connect Product data.
The Product Data page is displayed with the below tabs:
A Sync Products toggle is available to turn off syncing as needed. When disabled, data is out of sync from Ordway to NetSuite and vice versa.
Import/Export Option
When mapping a large number of Products, use the Export and Import Products option found under the More button above. The Export Products file provides a list of all active Product and existing mappings available to populate the Import Products import template.
Product Record Mapping
Click the PRODUCT RECORD MAPPING tab, to map all Product Record fields by selecting the appropriate NetSuite Item Name in the right column that corresponds with the Ordway Product Name on the left.
- Use the Products FILTER option to isolate specific Ordway Objects.
Product Field Mapping
Next, click the PRODUCT FIELD MAPPING tab. Select the appropriate NetSuite Item Field Name in the right column that corresponds with the Ordway Product Field Name on the left.
- After completing your configuration, click SAVE. The “NetSuite - Integration Settings successfully updated” confirmation message appears.
- Your changes are now applied and will take effect for future sync operations.
Journal Entries
The NetSuite integration supports sending either Ordway transactions to NetSuite or Ordway journal entries to NetSuite. Sending both journal entries and transactions isn’t advised as it would create duplicate entries. When sending Invoices, Credits, Payments, and Refunds to NetSuite, NetSuite automatically creates the corresponding GL impact for the transactions.
Notes
- If the user decides to send transactions to NetSuite instead of Journal Entries, Revenue Schedules should still be enabled and mapped from the Journal Entries module to send revenue recognition entries.
- When sending Journal Entries for the Invoice transaction type, it’s important to note that the GL Account selected on the Credit side of the Invoice Posting transaction will override the GL Account that has been selected as the default account in NetSuite. This is especially important when considering Deferred Revenue transactions.
- Click Map and Sync Journal Entries.
The Journal Entry Data page is displayed with the below tabs:
The Sync Journal Entries toggle is available to turn off syncing as needed. When disabled, data is out of sync from Ordway to NetSuite and vice versa.
Transaction Types
Click the TRANSACTION TYPES tab and select all or the individual transaction type checkboxes to sync to NetSuite.
- Unlock Journal Entry Currency toggle: When enabled, you can remap Currency, Exchange Rate, Debit, and Credit fields so Journal Entries are sent to NetSuite in the entity’s base currency instead of the transaction currency.
Journal Entry Field Mapping
Next, click the JOURNAL ENTRY FIELD MAPPING tab, to map all Journal Entry fields by selecting the appropriate NetSuite Journal Entry Field Name in the right column that corresponds with the Ordway Journal Entry Field Name on the left.
Journal Entry Line Field Mapping
Next, click the JOURNAL ENTRY LINE FIELD MAPPING tab. Select the appropriate NetSuite Journal Entry Line Field Name in the right column that corresponds with the Ordway Journal Entry Line Field Name on the left.
- After completing your configuration, click SAVE. The “NetSuite - Integration Settings successfully updated” confirmation message appears.
- Your changes are now applied and will take effect for future sync operations.
Invoices
Click Map and Sync Invoices to send invoice data from Ordway to NetSuite.
The Invoice Data page is displayed with below tabs:
- Invoice Field Mapping
- Invoice Line Field Mapping
- Reversed-Invoice Mapping
- Reversed-Invoice Line Mapping
The Sync Invoices toggle is available to turn off syncing as needed. When disabled, data is out of sync from Ordway to NetSuite and vice versa.
Invoice Field Mapping
Click the INVOICE FIELD MAPPING tab to map all Invoice fields by selecting the appropriate NetSuite Item Field Name in the right column that corresponds with the Ordway Invoice Field Name on the left.
Invoice Line Field Mapping
Next, click the INVOICE LINE FIELD MAPPING tab. Select the appropriate NetSuite Invoice Line Item Field Name in the right column that corresponds with the Ordway Invoice Line Field Name on the left.
Reversed-Invoice Mapping
The Reversed-Invoice Mapping tab defines how reversed invoices (credit transactions) from Ordway are mapped to Credit fields in NetSuite.
This configuration is required when invoice reversals or credits are synced to NetSuite.
Click the REVERSED INVOICE MAPPING tab. Select the appropriate NetSuite Credit Field Name in the right column that corresponds with the Ordway Reversed-Invoice Field Name on the left.
Reversed-Invoice Line Mapping
The Reversed-Invoice Line Mapping tab defines how reversed invoice line items from Ordway are mapped to Credit Line fields in NetSuite.
Click the REVERSED INVOICE Line MAPPING tab. Select the appropriate NetSuite Credit Line Field Name in the right column that corresponds with the Ordway Reversed-Invoice Line Field Name on the left.
- After completing your configuration, click SAVE. The “NetSuite - Integration Settings successfully updated” confirmation message appears.
- Your changes are now applied and will take effect for future sync operations.
Credits
Click Map and Sync Credits.
The Credit Data page is displayed with the below tabs:
A Sync Credits toggle is available to turn off syncing as needed. When disabled, data is out of sync from Ordway to NetSuite and vice versa.
Credit Field Mapping
Click the CREDIT FIELD MAPPING tab. Map all Credit fields by selecting the appropriate NetSuite Credit Field Name in the right column that corresponds with the Ordway Credit Field Name on the left.
Credit Line Field Mapping
Next, click the CREDIT LINE FIELD MAPPING tab. Select the appropriate NetSuite Credit Line Field Name in the right column that corresponds with the Ordway Credit Line Field Name on the left.
- After completing your configuration, click SAVE. The “NetSuite - Integration Settings successfully updated” confirmation message appears.
- Your changes are now applied and will take effect for future sync operations.
Payments
The Payment Data section controls how payment records are synced between Ordway and NetSuite. You can enable one or both sync directions depending on your business process.
Click Map and Sync Chart of Payments to connect payments in Ordway.
The Payments Data page is displayed with the below tabs and toggles:
- Payment Field Mapping (tab)
- Sync Payments from NetSuite to Ordway (toggle)
- Sync Payments from Ordway to NetSuite (toggle)
Payment Field Mapping
Map all Invoice fields by selecting the appropriate NetSuite Payment Field Name in the right column that corresponds with the Ordway Payment Field Name on the left.
Sync Payments from NetSuite to Ordway
When enabled
- Payments created in NetSuite are automatically pulled into Ordway.
- Updates made to payments in NetSuite are reflected in Ordway.
Sync Payments from Ordway to NetSuite
When enabled
- Payments created in Ordway are automatically pushed to NetSuite.
- Updates made to payments in Ordway are reflected in NetSuite.
Refunds
Finally, sync your NetSuite Refunds with Ordway data. Click Map and Sync Refunds.
The Refund Data page is loaded with the below tabs to collect the data:
A Sync Refunds toggle is available to turn off syncing as needed. When disabled, data is out of sync from Ordway to NetSuite and vice versa.
Refund Field Mapping
Click the REFUND FIELD MAPPING tab and map all refund fields by selecting the appropriate NetSuite Refund Field Name in the right column that corresponds with the Ordway Refund Field Name on the left.
Refund Method Mapping
Next, click the REFUND METHOD MAPPING tab. Select the appropriate NetSuite Refund Method in the right column that corresponds with the Ordway Refund Method on the left.
Disconnect NetSuite Integration
- You can disable the NetSuite integration at any time using the Disconnect (at the bottom of the main page) option from the main NetSuite - Integration Settings page in Ordway.
- The Disable NetSuite connection? dialog box is displayed with the confirmation message as shown below:
- Click CONFIRM to disconnect the connection.
Disabling the integration will stop the data sync between the data types that have been configured. All configurations are retained should you need to reconnect at any time.
Comments
0 comments
Please sign in to leave a comment.